The Materials


- Double-sided tape (Optional)
- 12 Ang Pows per lantern
- Stapler
- Scissors (Optional)
- Red string
- Beads/Bells (Optional)
- Tassel with string handle (if beads/bells are to be added as stopper, the longer, the handle the better)
Instructions:
 Step 1) Take an Ang Pow and fold it in half (right sides facing), length-wise. Unfold. Then fold it in half, breadth-wise. Unfold.
 Step 2) Fold the corners in using the folds you've made in step 1 as guides. (Refer to photo for a clearer look)
 Step 3) Folding frenzy time! You need to repeat steps 1 and 2 for 11 more Ang pows! We need a total of 12. Kids can help with the folding! =D
 Step 4,5 & 6) Take 4 of the folded Ang Pows, and place them as above. We need to staple every 2 adjacent flaps together at the fold:
 Do try to staple as close to the fold as you can, and you'll get this after stapling the flaps together:
 The 1st layer is done. Moving on to attaching the 2nd layer.
 Step 7 & 8) For every 2 Ang pows in the 1st layer, we'll attach 1 Ang pow horizontally like above. You'll get the following:
 2nd layer is done! It looks like a small hat! LOL!!!
 Step 9) The bottom layer is done separately. The bottom layer is done similarly to the top layer, and you'll get this:
 Do not attach this to the upper layers yet.
 Thread the handle of the tassel through the bottom layer as in the photo. How it looks like on the other side:
 The next few steps are optional if you do not want to add a bead/bell here. It's been a habit of mine to add either a bead or a bell to act as a stopper so that the thread will not slip through the hole while attaching the upper layer to the bottom layer...
If you want to add a stopper, it's best to choose a tassel with a long handle, as we'll be snipping this string handle to thread a bead or bell and tying knots to secure the bead/bell. If the handle is too short, it would be a big challenge to tie the knots. Skip to the next section "Threading the handle" if you do not intend to add any stopper bead/bell.
Adding a stopper bead/bell (Optional)
 Step 11C) Snip the handle in half as shown in the photo.
 Step 11D) Thread a bead or bell through one of the strings.
 Step 11E) Tie a knot to secure the bead/bell.
 Step 11F) Tie the 2 strings together at the ends with a square knot (or any knots that'll prevent them from coming undone) to form a loop. Well, basically, you're reconstructing the handle... LoL..!
Threading the handle
 Step 12 & 13) Cut a piece of red string, about 70 cm long. Thread this string through the loop of the tassel handle.
 Make sure that the point that meets the handle is about mid-point of the red string.
 Step 14) Tie the ends of this red string together securely. You've just formed a loop with this red string.
 Step 15) We'll now need to thread this loop through the upper half of the lantern. The dotted white line shows where I'm holding my red-string loop.
 Step 16) Try to open up the opening at the top of this upper half lantern slightly bigger, so that it makes the next step easier.
 Step 17) Thread the red-string loop through this opening.
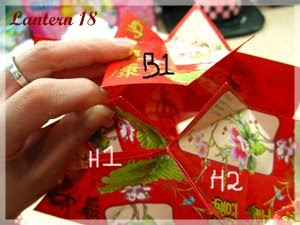
 Step 18) We now need to attach the bottom of the lantern to the upper part of the lantern. H1 and H2 shows 2 horizontal Ang Pows of the upper part of the lantern, and B1 shows an Ang Pow from the bottom layer. We need to attach the left flap of B1 to the right flap of H1, and the right flap of B1 to the left flap of H2. Staple at the folds.
 Step 19) Do step 18 for the rest of the perimeter, and you'll get the above. This is already a complete lantern but you can further change the look of it. Continue to step 20 to get a different look.
 Step 20) For every Ang pow on the lantern, glue/tape the flaps together on each short side as shown above. You could do this on the very top and bottom layer to achieve this look:
Or do it to all layers to have a rounded ball look. =D There are many other customizations which you can do to this basic pattern. For eg, adding more ang pows to each layer (This will give a more rounded look). Have fun!


3 comments :
我下到612星球的伴奏了,唱不?
Really???? Sure!!!
Hullo! Your CNY DIY posts are really cool! I'm also looking for CNY DIY kits. My email's daniel@goshadvertising.com, I would really appreciate it if you could let me know the places I can get them! :)
Post a Comment