Saturday, January 22, 2011
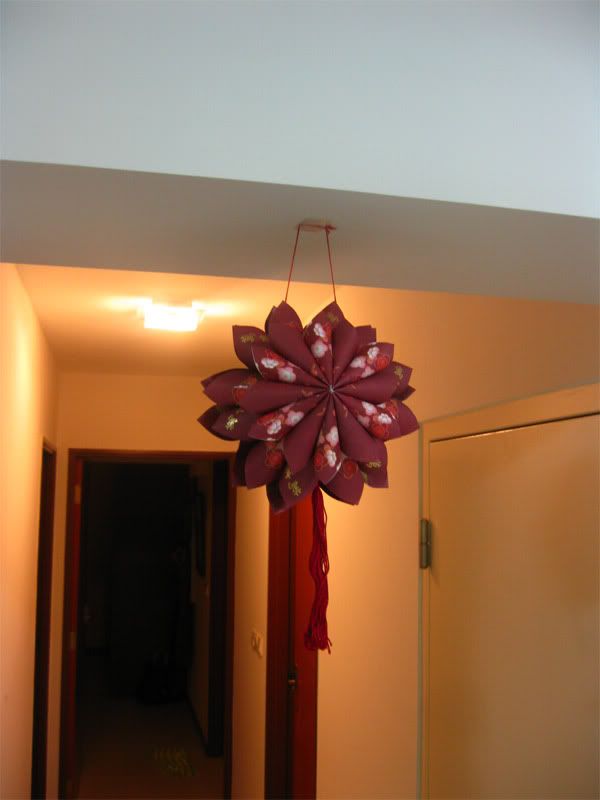
O' Crafty Day #14 - Ang Pow Lotus Flower Lantern
It's the time to decorate our house with Chinese New Year decoration again! This year, I'm going for a more minimalist/artistic look for the lanterns. Frankly speaking, I'm not really into "traditional" chinese ang pow lanterns that are sold/taught at our local craftstores. Also, I wanted to try something different from the usual ball lantern. Hence, this lotus flower lantern that I've come up with. It has a simple shape with a slight Japanese flair to it.
The Materials:
1) 12 x Long Ang Pows (Long ang pows are preferred)
2) 12 x Trimmed Ang Pows ( Try to keep the proportion the same as the original angpow)
3) Entire skein of red embroidery thread
4) Stapler (Preferably smaller sized ones)
5) Bells/Beads (more than 10mm in diameter preferred)
6) Scissors
8)(LOL!! I've totally no idea why I skipped 7!) White glue/hot glue gun/super glue
We need to first create a module from each of the ang pows (including the trimmed ang pows) Below is a video of how I make a single module:
How to fold a single module
You now should have 24 modules, 12 big ones and 12 small ones. What we want to end up with are 2 big lotus flowers and 2 small lotus flowers. Each big lotus flower requires 6 big modules; and each small lotus flower needs 6 small modules. In the following 2 videos, I'll teach you how to join the modules to form one lotus flower (both big and small versions use the same method of joining).
How to join the modules (Part 1)
How to join the modules (Part 2)
If you are using white glue, you would need to wait for the glue to dry overnight before continuing to the next step.
In the next step, you would need to glue a small lotus flower onto a big lotus flower. I've forgotten to take a photo of this step, so pardon me for using this simple drawing to illustrate the step:
Basically u need to stack the small lotus flower on the big lotus flower.If you invert the small lotus flower, you can see an inner hexagon. Apply glue to the rim of the hexagon like so:
Stack and stick the small lotus flower to the big lotus flower. Do the same for the other set of lotus flowers. At the end of this step, you'll have two 2-layered lotus flowers.
Next we're going to make a tassel for the lantern. The following 2 videos will show you how to do so:
How to make a tassel (Part 1)
How to make a tassel (Part 2)
I realised I only wrap the thread once around my fingers.. It doesn't matter if it's once or twice, so long as the thread is secured.
Next, we'll be attaching bells/beads to the tassel.
(1) About 3cm away from the top of the tassel, tie a knot at the handle thread.
(2) Take one end of the handle thread and thread it through a bell/bead.
(3) Tie square knot to secure the bell/bead.
(4) Invert one of your 2-layer lotus flowers, and lay the handle thread in the middle of one of the ang pows. Make sure the top of the tassel is outside the flower, while the bell/bead is inside. Tie another bell near the top of the ang pow on the direct opposite side. (This bell can be inside or outside of the lantern)
Apply glue to the bottom bell and the ang pow that it's on:
Let the glue dry a bit before gluing the two 2-layered lotus flowers together. Find the inner hexagons in both lotus flowers and apply glue to the rim of the hexagons. Take the lotus flower WITHOUT the tassel and place it on top of the other lotus flower like so:
Press the top flower down and hold it for a while till the glue has started to bond the 2 flowers together. If you've used white glue, let it dry for a few hours or overnight.
Once the glue is fully dried, tie the ends of the handle thread together like so:
And voila! You have yourself a lotus flower lantern made entirely from Ang Pows.
Optional:
To allow the lantern to hang even more beautifully (aka, the flower side facing front), separate the handle thread and glue each strand to the nearest petal like so:
Tags:
Chinese New Year
,
O' Crafty Day
,
Paper Craft
Subscribe to:
Post Comments
(
Atom
)


3 comments :
I like this lantern! xD
LoL! Thanks!
Thank you for teaching the steps (each procedure so carefully) to making this lantern using just red envelopes! You are the best!
Post a Comment