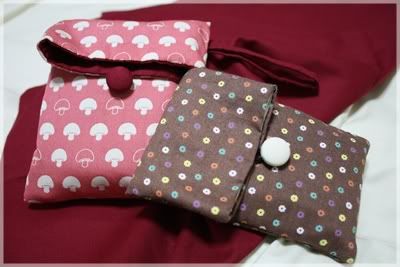
Thought I'd make one, and since I'll be bringing the cam along to Hongkong and I'll be flying in less than 1 day's time, the project had to be a simple and fast one. And here's what I'd come up with:

The brown one is for my handphone, and the pink one is for my vivitar... Anyhow, on with the tutorial...

1) The materials: (from left) Felt/Interfacing, main fabric, 1 button, thread, elastic thread/cord, contrasting fabric (lining)
Other materials: Scissors, needle/sewing machine, glue

2) Measure and cut out a rectangular piece of felt that covers fully the stuff you want to cover when folded in half (make sure to leave about 0.5cm to 1cm sewing allowance). Mine measures 9.5 inches by 5 inces.
Then, add an appropriate length to each side of the felt piece (lengthwise). In my case, it's 3 inches on each side. You want to make sure that this extra length is shorter than 1/2 the length of your felt piece.
Cut out a rectangle from the main fabric and contrasting fabric respectively with this new length and a width equals the width of the felt piece. For my case, it's 15.5 inches by 5 inches. Measure out 3 inches from the ends of each fabric piece and make a mark. This is needed for the next step.

3) Place the felt piece on the wrong side of the main fabric, touching the 3-inches markings (refer to photo). Pin the felt piece in place.

4) Fold the main fabric + felt piece in half, right sides facing each other. Sew along the 2 edges as above. (You could hand sew, or machine sew) If you want to add a strap, this is the time to do so. Make sure the loose ends of your strap touches the felt area (you wouldn't want the strap to land on the flap).

5) Flip your sewn piece inside out.

6) Take your contrasting fabric and fold it in half, right sides facing each other. Sew along the whole of 1 edge, and leave a gap (about 1.5 inches wide) for the second edge. This is for the purpose of flipping the bag inside out, once the lining is attached to the outer bag that you've made in step (5).

7) Insert the bag you've made in (5) into the the unflipped lining that you've made in (6). This step is very important! What you'll have is the right sides of the bag and the lining facing each other.

8) Where the raw edges of the bag and lining meets, make sure that the center of a seam of the bag matches the center of a seam of the lining. (refer to photo) Pin it in place. Do the same for the other seam.

9) Sew the 2 fabrics together along the raw edges.

10) Now the magical moment. Pull the main fabric bag out, through the gap of the lining. (refer to photo) Press the bag and the lining (now flipped) flat along the sewn sides to neaten the bag.

11) Sew up the gap of the lining using hidden stitches.

12) Push the lining into the bag. Try to spread the lining out neatly into the bag. You could use pencil or pen (or anything long and thin) to push the corners out.

13) If this pouch is specially made for containing certain stuff (like my vivitar cam), place that stuff into the bag, and fold the flap down (using the felt that's sewn inside as a guide to where it should be folded) Make a mark to know where the button should be sewn.

14) Sew the button to the mark that you've made in (13).

15) Attach an elastic cord to the top layer of the flap (you could sew it outside or inside the bag, depending on your design. You could also attach the elastic cord in step (9) when u sew the bag and lining together.

16) And wahlaahh! Your cute Jappy-looking pouch/bag is done!
Side-Track:
I've also made some coasters from a Jap Coaster Kit!


1 comment :
Hi!
Post a Comment