Rhinestic's Knick Knacks
Showing posts with label Jewelry. Show all posts

Monday, May 05, 2014

Please Throw Me Some Fairy Dust! + a mini craft update..

Yah, I am seriously in need of some Fairy Dust to magically jump start my burning passion for making things. This past month has been pretty much an arid craft desert for me.

Perhaps it's the extremely bad weather. Besides the occasional pockets of heavy downpour, it has been really humid and hot. It's the kind of weather which you'll have totally no mood to do anything. And when I have no mood, everything just spirals into procrastination and the non-existence of motivation! Maybe I should just shift my resin/jewelry workspace from the non-air-conditioned living room area to my air-conditioned sewing room... Or perhaps I should just kick my butt and just get the sewing going! Sigh.

Well. There's still a tiny glimmer of crafting magic in the air last week. I'm planning (oh yeah, though I lack the motivation to do any physical crafting, I have tons of ideas and plans in my head... Oh, the irony!) to include some mixed media buttons and jewelry pieces involving metal work and wood work. 

I finally got some of the materials and tools needed for torch soldering and got my hands dirty on some first time soldering. I tried some gold-filled solder-filled wire first... And it was a total failure.. None of my test pieces soldered properly! I guess the omission of flux was what caused my failure. == I thought I should stop wasting more of the gold-filled wire (which ain't cheap) and wait till I have some flux on hand before testing that again.

Anyway, I switched to Argentium silver for my next testing. This is the material which I intend to use for my future pieces for the shop. And you know what? I love Argentium silver, a lot! Together with the Argentium silver soldering paste, it's quite a breeze to work with! I managed to create a letter 'a' and a geometric focal piece of triangles, which I later made into stackable bracelets.


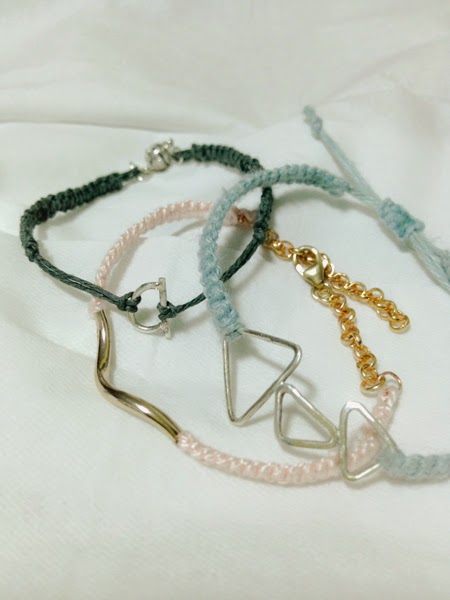
I used half-hard wires and personally, I had to anneal them before creating the tiny triangles. In case you're wondering, I learnt quite a lot from the various YouTube soldering videos and the metalsmithing classes on Craftsy.

On the sewing front, I made a waterproof lunch bag, which was really a quick and simple project. And that was doubled up as a gift bag which contained some yummy gifts for another friend of mine. BUT, I'd forgotten to take a photo. Man. ==

Tuesday, July 02, 2013

Mr. Bow Tie and Miss Necklace's Love Child

And so the bow collar-clips is born..


A random idea that I have been experimenting with. =)

Monday, May 06, 2013

Capturing the essence of time..

For time flew
and old I grew,
Dreams are still dreams
Unfulfilled.


Feeling kinda "emo" at the moment. When you feel your days could have been spent on something more fruitful and yet time is not there waiting for you to do so. This is definitely a project of instant gratification. I already have the bottle, the watch parts and the findings on hand. All I needed to do was putting them altogether. Inspiration was from a photo of steampunk earrings I found on the internet.

Thursday, January 21, 2010

抱病上场

Yes, I still made it to the PMC silver clay workshop despite the mild dizziness and drowsiness (due to medication). Here's what I'd made:

Photobucket
Order in Chaos

I dare say this pendant is very me! Haha... My style is simple chic and cool.

Photobucket
Nyanko-chan

Nyanko-chan wasn't in my plan as I thought I might not have enough clay for Order in Chaos.. Since I'd extra clay, I decided to make a cat.. It's kinda sad that one part of the tail broke off from Nyanko-chan when I dropped the fired pendant on the floor. Guess I didn't put enough clay over that weak spot before firing... Had to use glue to fix it instead... ><''

My colleague made this beautiful piece:

Photobucket

Considering this was our first attempt at making accessories from silver clay (it wasn't easy molding the clay as it dried up easily), the end results were quite good (except for that broken tail)!

Friday, July 10, 2009

Long time no crochet...

Finally did that 2 days ago to de-stress...

Anyway, this was a kit I bought months ago. Wanted to make this necklace last week, but was too tired.

Photobucket

Photobucket

Photobucket
Wore it to work..

Tuesday, June 23, 2009

Where cats can never get weirder...


Trying to be more individualistic and artistic with Japanese air-dry polymer clay. Who will be next in the Weird family? (That's my half-sewn shorts my nyanko-s were placed on... LOL)

Friday, March 27, 2009

Royal Goth

Photobucket

Made a necklace to match my black-purplish dress (which I'll be wearing to a friend's wedding). You can see part of the dress in the photo.. Lol..

Saw the pendant kit at a bead shop, but was appalled by the price... I mean, I could buy the same materials at a fraction of the price of the kit, and I still have left-overs! Granted I had to figure out how to do the pendant myself... (Which was kinda fiddly but manageable)

But you know, the other great thing about not relying on kits is that you get to choose your own beads, and you can go wild on the basic design. The original kit I saw was this sweeter looking pendant (I remembered it was some pinkish swarovski crystals.. but not the pink I like) that was tied to a pink ribbon (acting as the necklace chain). Totally not the style for my dress.. But I love, love the use of the 4-holed metallic beads to make up the rectangular pendant!

So I used some dark-silver beads and deep purple swarovski beads instead. In place of the ribbon, I chose this double-stranded chain (very cool, very gothic) and a dark-silver bail to hook the pendant and chain together. Love the end result!


pendant
A closer look at the pendant...

Saturday, January 03, 2009

Completed Classy Pendant Necklace (Miyuki set)

my hatHave a clearer look at the necklace chain~


my hatAn arty shot of the necklace =P

Tuesday, December 30, 2008

Stringing seed beads is tiring... LOL

Yeah, I'm now onto a new beading project. Bought another Miyuki necklace beading kit some time back.

Thought I'd make it to wear for my friend's wedding dinner, but alas, I bought this turquoise dress at Hongkong (Part of the dress can be seen in this post... =P) and decided to wear it to the dinner, and this "yet to be started" necklace was a total mismatch.. LOL..


But anyway, I finally started this project 2 days back, and completed the pendant part.

Photobucket

Now, I'm stuck at the arduous task of stringing tiny seed beads to make the necklace chain... LOL... Will be back with more pics once I've finished this necklace.. =P

Wednesday, December 24, 2008

Made 2 more pendants and a pair of earrings

... on Monday for the sake of matching an aqua/turquoise-colored dress that I bought in Hongkong.. It's very last minute though.. Haha.. Coz I had to attend the wedding dinner that very night.. =P

pendants

aqua earrings

Earrings were made with aqua blue and turquoise Swarovski crystals and some small sterling silver beads, sterling silver eye-pins and white gold earring hooks.

Well, I ended up not wearing any of the pendants... Felt that wearing both the earrings and pendant looked kinda too much for me.. The earrings alone balanced the whole outfit pretty nicely. =P

aqua earrings with dress

That's the color of my dress~ Hehe..

Saturday, December 20, 2008

Pendants~~

Made the very first batch of glass pendants. Gave one to Angeline... My mum took one... And I'm now left with 3.. LOL..

Glass Pendants

Monday, November 10, 2008

Shiny Shiny Earrings~~


Made a couple of pairs of earrings yesterday night~ For Passion, I'd used 925 Silver earring hooks, 925 silver eye pins and head pins, fancy metal rings and Swarovski crystals. For Digi-cool, I'd used white gold earring hooks, 925 head pins, fancy metal rings and Swarovski crystals.

Wednesday, October 29, 2008

Some handmade birthday gifts...

As mentioned in one of my previous posts, here are some photos of the birthday gifts I'd made so far~


Necklace and bracelet set for Alina. Made of handmade resin clay roses (sealed thrice with matte sealer), Swarovski pearls, Swarovski crystal butterfly charm, metal butterfly charms and interesting-looking chains.

The following are birthday cards made from different mediums.


Base of cards are some craft papers I bought at Popular bookshop. The 3D portions were made of different types of resin clay, ultra-mini plastic bottles and wires. And yes, those cookies and sweets in the jar are really very tiny... (the card is 1/4 the size of an A4 paper) =P

Still have some more gifts to make~ Will take more photos once I've finished making them...
(Still have my O' Crafty Day to prepare.. ><)

Saturday, October 04, 2008

1st try on clay miniatures

Okay... not so "mini" miniatures.. Had a try on making clay bunny miniatures.. And my 2 bunnies turned out about 3cm tall each (which is slightly taller than an inch.. and yes, the height includes the ears.. LOL) Have a look!

clay bunnies charms

clay bunnies charms

clay bunnies charms
Can see that they are not perfect... Still have lots of room for improvements.. =\

Wednesday, October 01, 2008

Crafty Tuesday - #3 Making a simple clasp

Sorry for the delay! For this week's tutorial, I'll be demonstrating how to make a simple clasp from wires. (You know, there are always times when you need a clasp, and you just run out of it...)


The materials:


1. 26 gauge wire (*Optional if you have bigger jump rings, about 5 or 6mm, around in the house. Should be thinner than the wire from 2)

2. Thicker wire than 1. Mine is about gauge 20 or 18, maybe?

3. A 5mm knitting needle... (*Optional if you have bigger jump rings...)

4. 3mm jump rings. (*1 and 3 are not needed if you also have 5 or 6 mm jump rings)

5. Chain nose pliers

6. Round nose pliers

7. Nipper tool


Okay, the first couple of steps are needed if you don't have 5 or 6 mm jump rings around:


Coil your wire from (1) around the knitting needle as above. Then use your nipper tool to cut across the coil like so (the dotted red line):


And you'll get a few rings like below:

This is used as the loop to hook onto the clasp.


The next few steps are for making the main part of the clasp:


Cut out a piece of wire from (2) about 2 to 2.5 inches long. You then use your round nose pliers to form a loop on one end like so:


You then make another loop opposite of the above first loop as below:


Trim off the long tail and press down that end until it leaves a small gap as shown in the photo below:


Next steps are for finishing up the clasp:

Take three 3mm jump rings and chain them up and then hook one end to one side of the clasp as above. Close that side of the clasp shut so that the chain of jump rings won't come off. This is one side of the clasp.

Take 1 big jump ring (that you've made earlier or take 5mm or 6mm jump rings) and three 3mm jump rings:


And chain them up like so:


You then hook this big jump ring chain onto the empty side of the clasp you have made earlier and you'll get a complete clasp:


You also can get fancy and beautify the clasp like this:


What I have demonstrated in this tutorial is just a simple and basic clasp. Be creative and have fun making your own clasp! *wink*

Thursday, September 25, 2008

My version of the wire crochet necklace


I basically followed Karla Kam's version, but instead of having a single 3-stranded piece, I opted for a double 2-stranded version with one shorter than the other.

Tuesday, September 23, 2008

Crafty Tuesday - #2 Wire Crochet Necklace

I guess by now, this has been a very common technique to incorporate crochet and wire-jewelry making. There's a video on youtube teaching how to make a crochet necklace (there are more diy jewelry making vids by Karla Kam in youtube):


Alicia Bergin (a fellow Ravelry member) has a tutorial on making another variation of the crochet necklace (pretty neat, I dare say):


Crochet me also has another really cool version of the necklace. The designer, Julie Holetz, even made a pair of earrings to match the necklace:


Stay tuned for my own version of the crochet necklace! *wink*

Saturday, September 06, 2008

Love's in the Air - Swarovski Necklace

A romantic and vintage-looking piece for my dearest friend, Diana, as a wedding gift. My initial thought was to create a modern, edgy piece, but that idea kinda flopped...

Then, something clicked in my brain... Why not take what she likes and put them into the piece? Diana's a nature-lover and loves shades of green. She also has that gentle, classy and elegant look. A romantic vintage-style would look great on her!

With those ideas in mind, I've created ~Amour, Love's in the Air~. =) Totally made of Swarovski crystals, handcrafted resin clay roses, silver-colored filigree and sterling silver chains and findings. And of course, it's definitely made with lots of love. =P

Enjoy the photos! ^.^

whole necklace

live action shot

Amour, Love's in the AirThe bluish tint is from the morning light.


front viewAlso taken in the morning


heart-shaped toggle claspHeart toggle clasp


As for why it's called Love's in the Air.... See those 2 butterflies? LOL..
Related Posts Plugin for WordPress, Blogger...